Wellcome to PlasticFish Online!

Trying to get this page back on track!
Showing posts with label vehicles. Show all posts

Thursday, February 16, 2012

Stuff, downtime and painting that needs to get done

I haven't been motivated to paint or build anything in some time now. And that is why the posting has been mostly sporadic for some time now.
But now work is starting to pile up on my desk.

A friend of mine talked me into trying out Warmachine, so I got a Khador Battlegroup just waiting to get some paint. And I also have the Baneblade to finish. Right now I've just finished converting a finecast Imperial Guard Commissar to act as the corrupted tankcommander.


It took some cutting and some bending (it is surprisingly simple to bend finecast resin after you flush it in hot water). But at last I got it into the right position.

I also need to finish the barrel-setup on both sides of the tank. And some more dirt and other foul stuff.

Sunday, August 28, 2011

Another go at my Baneblade, part 1.

As I said in my previous posting I've been putting some work into getting my old Baneblade finished. I wasn't satisfied with the outcome the first time around, so now I'm trying to fulfill the original vision I had for this project.

The picture above is a before picture. This was the tank before I started to update it.

First, I did a bit of repainting. And painted over all (!) of the brass rivets that I so painfully picked out the last time around. I also added the colours of my "Strom Renegade" Imperial Guard army, the red and yellow stripes, both on the armor and on the turret. I also, after some digging in my bitbox, found and added the storage compartments to the turret. I also found some pics on the GW site, of a Tallarn Baneblade with the muzzlebreak from the Hellhammer cannon added as a muzzlebreak to the regular Baneblade cannon. It's a simple, yet nice touch that makes it stand out a bit more.


I also added the smokelaunchers and a couple of more Nurglings (still got a few more to add). Most of the Nurglings also needs to be repainted - since most of them was painted quite hasty the first time around.


On top of the turret there will be a gunner with a heavy stubber, a screaming tankcommander and maybe a gurdsman riding along on top of the storagebins.

Right now I've focused almost all my work on the right side of the tank, both on the side and on top of it - I need to give the turret and the whole of the left side a bit more love.

A bit of a close-up on the weathering on the right side. The tracks still need to get its proper colour and it might need more "slime".
More pictures will come, as soon as I've gotten some more work done on it!

Saturday, August 27, 2011

A bit of an update.

Ok, I'm back again. But no pictures of my ongoing projects. Since the last posting I've finished the magnetized Russ and I'm planning on adding another one or two to the army.
I've also started to do a bit of repainting on my old Baneblade.

BaneBlade, before the repaint.

I got this one as soon as it was released and I rushed the painting to get it ready for a Apocalypse game at the local GW-store. So I took some shortcuts and I've never really been satisfied with the result. So I've been adding some more details (some more Nurglings!) and some more paint, including a lot of battledamage.
More pictures are on the way!

Monday, August 1, 2011

Working on the Leman Russ

So, I'm on vacation. And there are a lot of other things I've been doing besides from painting. But I've managed to slap some paint on the magnetized Leman Russ I started a while back.

As I said before I'm aiming at getting it into the same colour as the other vehicles in the army. A bit of a challange, since I've forgotten the exact combination of paints.
The left side is still a bit "too clean". Well, both sides and the top, front and back needs more work.
The top-view shows that there are a lot of work left to be done! Yes, I also need to start to work on the turret and the weapons!

Monday, July 11, 2011

Leman Russ magnetized

Once I figured out how much of the gun had to come of it was no problem replicating the process on all of the guns. I simply removed the squared part, that fits into the turret, slapped a magnet on it and carefully fitted the shield on top of the part of the gun that sticks out from the turret.
I also fitted magnets to all of the guns. So the guns fits nice and tight against the turret.
To make the sponson-weapons and the hull-mounted weapon stick into place a fitted magnets into the bottom of the empty sockets and glued a peice of metal to the ends of the guns. It's not a really tight fit, but it keeps them in place much better than if you just leave them unglued.
I glued the sponsons in place, I could have magnetized them but I didn't want to have the whole tank go into peices if you picked it up from the table in the wrong way...

Since I'm playing a traitor-guard army this one will have the same kind of paintjob as the Vendetta and the Sentinel that are already in the army (pictures of the vendetta and the sentinel).
 
Now I just need to add some more metal to the  weapons and I'm ready for the painting!

Tuesday, February 15, 2011

Space Marine Whirlwind-build

I had a Rhino that I had painted for my DeathGuards a couple of years ago, but since I haven't played with that army in a while I thought I could salvage that chassi for something else. So I stripped of all the Nurgle-stuff and added some plasticard reinforcements. I also started on a MLRS-styled rocketlauncher. It will only be attached to the roof so it can easily be removed and the chassi used as a regular Rhino or Razorback.


More pics later on when more painting has been done!

Monday, July 26, 2010

Finished the Valkyrie/Vendetta

The local GW painting competition "forced" me to finish this one. It's for my Strom Renegade Army.


The weapon mounts are all magnetized so it can change weapons and go as a Valkyrie or a Vendetta. I also made the side gunners removeable. It's designated as "01" but there will be no more flyers for my army (not for a while anyway...).

Monday, June 21, 2010

Raptor Chapter Landraider

So I got around and added some last minute touches to the "Green Machine". Kind of hasty, but I needed it for a game last week. A game where it got ripped to shreds by an Ork Warboss in the third turn.


Thursday, April 1, 2010

Work continues!

Work is progressing on The Valkyria/Vendetta build. And now the work is starting to get into the fun part.


I've started the weathering process on some parts on the hull and I added some white stripes on the wings. I will also add some stripes to the fins.


A bit of a closeup of the left wing. The work will continue tonight as well as the planning of the placement of some nice Chaos-insignias!

Monday, March 22, 2010

Airsupport!

So I really went back on the plan, not to add any vehicles to my Traitor army. After building my first Sentinel I wanted a bit of a challange - so instead of buing two more sentinels I baught a Valkyria Transport.
And right now I'm detailing the interior:


A bit of a top-view:


Side-gunner from the outside:


Pilots:


As for armaments I will magnetize the whole lot - and build some Lascannon-mounts so I can upgrade it to a Vendetta gunship. I have used the same paintingtechniques on the interior as I used on the Raptors Landraider. And as for the colour of the outer hull I will go for the same as on the Sentinel - with some nice Chaos Stars and insignias.

Monday, March 15, 2010

Magnetized Traitor Sentinel

I've been working on this one instead of watching the paint dry on my Land Raider. And this is the progress as of last night. I have opted for a discreet paintjob, with only the Chaos-star on the left side to signify it's allegiance.
This is the first mini ever that I've tried to magnetize. I have used a small magnet that I found in a FOW tank-kit. Since I didn't find any use for them there I'll be using them to magnetize the weapons on my comming Sentinel Squadron for my Traitor army:

Heavy Flamer, Lascannon, Plasmacannon, Autocannon and Missile Launcher are all fitted with a small metalstrip, so it can easily lock into place.

Sunday, March 7, 2010

Land Raider, day-by-day, part 4

Part 4 of these postings includes the progress from day 4 and 5 on my Land Raider for my Raptors Chapter space marine army.
After painting the interior of the tank I thought fitting all the pieces together vould be a breeze. I ran into some problems, especialy when it comes to fitting the roof-part into place. Even after I dry-fitted it all together two times just to be sure, I had a hard time putting it all together. But in the end it turned out ok.


Next step was to assemble the heavy bolters and the Las-cannons with it's mounts.


Now I have done the overall colour of the tank to match my army and some detailwork on the cannons. Late last night I started assembling the two hatches that go on top of the roof. The colour is quite flat right now so I need to do some shading and some highlighting, paint the tracks and continue on the engine-piece at tha back, also the headlights need some paint.

Friday, March 5, 2010

Land Raider day-by-day, part 3

So the work continues! I finished the detailing on the interior of the Land Raider last night. I also added a trio of Bolters to the empty gunrack.


The hatches and the engine-compartment:


And a nice close-up of the engine-compartment, with the name of the machine-spirit: "6 4 2".

Thursday, March 4, 2010

Land Raider, day by day, part 2


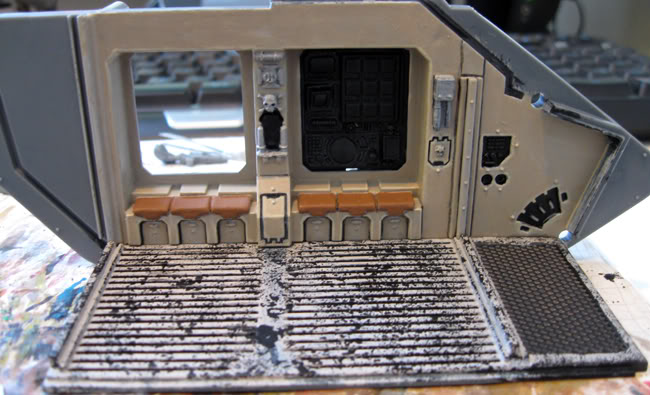
This is the second day of this day-by-day experience. Last night I spent a lot of time on the computerpanel and the weathering-effect on the left side of the interior and the floor.


The computerpanel was a bit time-consuming to paint but a fun part of the project. Tomorrow I'm planning on having the right side of the interior completed so I can move on to the engine-panel.

Wednesday, March 3, 2010

Land Raider, day by day

Last night I started working on a Land Raider kit for my Raptors. For some time now I have been spending my time working on other armies but after I did some touch-up work on my Terminators for my Raptors Chapter army I decided that the army need a bit more love - in the form of a Land Raider.
Since I plan to work on this kit until it's finished I'm going to post a "day-by-day" update.
Day 1:
I started on the interior pieces of the tank, I also started with some weathering on the floor-piece.


Tonight I will continue the work on the inner details, the computer, the shrine, seats etc. And I will start on the other wall if there's time.

  ©Template by Dicas Blogger. - Modified By The PlasticFish -

TOPO