Wellcome to PlasticFish Online!
Trying to get this page back on track!
For some time now I have been working on the Valkyria Transport/Vendetta Gunship. And I have to admit that I'm getting a bit tired of it. I will not be building another one of these kits, not in a while anyway.
But let's return to the progress at hand:
I masked the areas of the hull that's closest to the engines. I didn't want any of the weathering spilling outside the engines at this moment. I've also blacklined all of the different panels the hull consists of.
I've used the same technique for the weathering of the engines that I used for the Raptors Chapter Land Raider (still a work in progress but will be completed as soon as this bird is finished). I'm still pondering how much of the rest of the kit I will attack with my weathering. This time I'm trying to think before I start - I usually have a tendency to overdo the weathering part of many of my larger builds...
In an effort to try and save some space, when it comes to transporting this kit, I have magnetized the cockpit so it can be removed when it needs to packed away. I have also magnetized the two hardpoints under the wings and the cannon-mount on the left side of the cockpit. I can now chose freely what weapons it will be carrying into battle. I have also constructed two sets of Twinlinked LasCannons for the Vendetta-variant (still missing another Twinlinked set for the cockpit).
So I really went back on the plan, not to add any vehicles to my Traitor army. After building my first Sentinel I wanted a bit of a challange - so instead of buing two more sentinels I baught a Valkyria Transport.
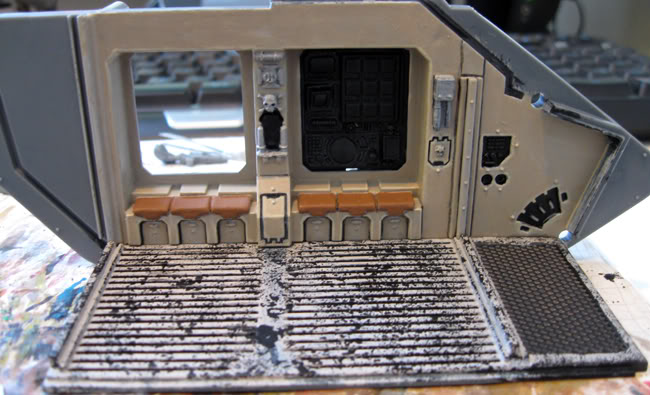
And right now I'm detailing the interior:
A bit of a top-view:
Side-gunner from the outside:
Pilots:
As for armaments I will magnetize the whole lot - and build some Lascannon-mounts so I can upgrade it to a Vendetta gunship. I have used the same paintingtechniques on the interior as I used on the Raptors Landraider. And as for the colour of the outer hull I will go for the same as on the Sentinel - with some nice Chaos Stars and insignias.
I've been working on this one instead of watching the paint dry on my Land Raider. And this is the progress as of last night. I have opted for a discreet paintjob, with only the Chaos-star on the left side to signify it's allegiance.
This is the first mini ever that I've tried to magnetize. I have used a small magnet that I found in a FOW tank-kit. Since I didn't find any use for them there I'll be using them to magnetize the weapons on my comming Sentinel Squadron for my Traitor army:
Heavy Flamer, Lascannon, Plasmacannon, Autocannon and Missile Launcher are all fitted with a small metalstrip, so it can easily lock into place.
Part 4 of these postings includes the progress from day 4 and 5 on my Land Raider for my Raptors Chapter space marine army.
After painting the interior of the tank I thought fitting all the pieces together vould be a breeze. I ran into some problems, especialy when it comes to fitting the roof-part into place. Even after I dry-fitted it all together two times just to be sure, I had a hard time putting it all together. But in the end it turned out ok.
Next step was to assemble the heavy bolters and the Las-cannons with it's mounts.
Now I have done the overall colour of the tank to match my army and some detailwork on the cannons. Late last night I started assembling the two hatches that go on top of the roof. The colour is quite flat right now so I need to do some shading and some highlighting, paint the tracks and continue on the engine-piece at tha back, also the headlights need some paint.
So the work continues! I finished the detailing on the interior of the Land Raider last night. I also added a trio of Bolters to the empty gunrack.
The hatches and the engine-compartment:
And a nice close-up of the engine-compartment, with the name of the machine-spirit: "6 4 2".
This is the second day of this day-by-day experience. Last night I spent a lot of time on the computerpanel and the weathering-effect on the left side of the interior and the floor.
The computerpanel was a bit time-consuming to paint but a fun part of the project. Tomorrow I'm planning on having the right side of the interior completed so I can move on to the engine-panel.
Last night I started working on a Land Raider kit for my Raptors. For some time now I have been spending my time working on other armies but after I did some touch-up work on my Terminators for my Raptors Chapter army I decided that the army need a bit more love - in the form of a Land Raider.
Since I plan to work on this kit until it's finished I'm going to post a "day-by-day" update.
Day 1:
I started on the interior pieces of the tank, I also started with some weathering on the floor-piece.
Tonight I will continue the work on the inner details, the computer, the shrine, seats etc. And I will start on the other wall if there's time.